Papermaking At SCA Demos and Outdoor Events
When the SCA does a lengthier outdoor demo, I usually spend my time at the demo making paper. Papermaking allows random people to participate and make a page. Parents appreciate that their child leaves with a paper they made and didn't have to pay for. Here is some information on how I have this set up and operate it. It is not a perfect reproduction of historical technique but it is feasible to be done at day-long demos.
A Very Brief History of Papermaking
So, the Chinese had it first using beaten hemp. Now, they also passed it on to the Koreans and Japanese, their trading partners so that Japan had it by 7th C CE. Now, how did it get to the west. Well, when the Persians conquered a territory, they didn't just take all the gold and run. They would also take the finest craftsmen from the cities they invaded. So, when the Persian's captured Samarkand in 755, they got gold, silver - and paper. Here they started using flax/linen which was more available to them. From there, it went to Byzantium and Spain and from there through more of Europe. Now, paper was the "cheap alternative" of the good stuff (parchment/vellum) so it was used for the less treasured stuff - letters, accountings, etc. It was the printing press that caused books to really start being made with paper. When you make a book at a time, you can raise enough sheep and cows. But what happens when you are making thousands? Well, the sheep and cows just can't keep up.
Yes, this is VERY brief. It is intentionally short because how much you can actually cover as people walk by is very limited. If they are interested, chances are they have already looked it up in Wikipedia before you have said "Hello."
Materials Needed
ON SITE:
- Paper Pulp
- Water
- Large waterproof container bigger than the frames you are using
- Table with a top that will not be damaged by water exposure
- Couching cloths
- Frame and deckle (Directions to make your own are below
- 2 cookie sheets
- Bungee cords - 2 that stretch to about a yard
- Waterproof container or bag for transporting wet materials home
- Cloth drying rack (optional)
- Whisk (optional)
- Rolling pin (optional)
AT HOME:
- Clothesline
- Clothespins
- Fan (optional)
Notes on Materials
PAPER PULP: One seemingly inexpensive source for paper pulp is ground-up newsprint. Creating paper pulp from newsprint is time-consuming and you likely want to devote a pot and blender to this process. If this appeals to you, google making paper pulp from newspaper and you will find plenty of instructions and examples. Now, paper made from newsprint paper pulp seldom needs sizing. Sizing is a substance, often animal gelatin, added during or after the paper making process to control how fast the paper absorbs ink. However, I don't really like the paper that newsprint makes. I did the newsprint route once. Because of the time requirements to make newsprint paper pulp and the poor paper quality, I decided that I wouldn't do paper making at demos until there was a better pulp alternative.
My savior for doing paper making at demos has the name Twinrocker. Now, before a demo, I order #89 Cotton Rag, medium fine beating and 1x sizing which runs about $63 with shipping to provide enough for 2-3 weekends of papermaking. The resulting paper is much better and useful for other projects. It is akin to the cold-press cotton paper you would purchase from an art supply store. The paper I make this way gets used by my bookbinding and watercolor-painting friends. Now, if you skip the sizing in the pulp order, you will want to add some yourself so that the dried paper so that it doesn’t behave like a paper towel. Twinrocker's pulp with sizing works well.
The paper pulp arrives sealed in a plastic bag, and resembles thick oatmeal; you will thin it out before making the paper. You do not want the pulp to dry out. So, keep the bag sealed or transfer its contents to sealable containers for ease of transport and storage. I am fond of the containers a gelato comes in with their screw top lids.
Dryer lint has been suggested for pulp material. It can give you color; but it can give you headaches. First, dryer lint clumps and you have to break up those clumps. Second, unless you and your co-habitants are bald, you will need to get the hair out of the lint. Dryer lint from the first wash after purchasing fabric is the best if you are going this route.
WATER: Three to five gallons should be enough for an afternoon of papermaking, depending on how long the session and the volume of sheets produced. Papermaking is a wet process, so your day’s attire should be easily washable.
TABLE: Ideally, I like to use a low table so that it is easy for children to join in the fun. It is not safe for children to stand on a chair in order to reach a higher tabletop! The most important thing to remember is that once you begin, the table is going to be more or less wet all day, holding the container full of water and pulp, and the wet, newly-made paper -- so make sure it is water-proof, or at least highly water-resistant.
FRAME AND DECKLE: In papermaking, a frame is a mold form with a screen bottom to catch pulp; a deckle is a sort of frame or fence around the frame mold. These two items together create your page form. I find that the frames that make sheets about 5"x7" is a great size. It is easier for children to handle. It is easier to find the tub to hold the paper pulp. Larger sizes are certainly doable but then the frame often requires additional supports. Larger sizes are more challenging for a beginner to drain and transfer to couching cloths. Thus, I’ll make large pages myself, for demonstration only.
You can buy a frame and deckle at craft supply stores, but you can easily make your own. Here is how: Start with two matching plain wooden 5"x7" (130 mm x 180 mm) picture frames. One picture frame will make the frame – sometimes called the mold – and the other picture frame will make the deckle. First, remove all frame packaging, glass and inserts. Lay the piece of window screening across the back of one picture frames and fold the screen edges under. Staple the screening to the picture frame. Small nails can be used in lieu of staples. If you want to add a watermark to leave an imprint in the finished paper, use coat thread to create a design, laying it in place on the screen and tacking it into place with thin thread. Using thread to create the watermark means it won’t rust.
Now, historically, the frame and deckle would have been hand built to be much larger. It would have had a hand-built wire mesh rather than window screening. However, if you were to build one of them, chances are, you wouldn't let random kids be playing with it, would you?
CONTAINER: The container must be larger overall than the outer dimensions of the frame and deckle, in order to accommodate your hands in the tub on either side of the frames and also to leave some free area to stir the pulp around. The ideal paper-making tub is ceramic or metal rather than plastic. I found an oversized salad serving dish, 12”x12” (30 cm x 30 cm) square and about 6” (15 cm) deep that worked for a 5”x7” (130 mm x 180 mm) frame. The deep metal steam table pans for industrial kitchens also work. I was floored when I found my favorite solution - it is a planter container with no drain holes and is designed to look like wood. This container of my dreams even worked for me at Renaissance Fairs that were strict about not having any obvious modern items.
COUCHING CLOTHS: These are cloths that hold the wet paper as it dries. For a smoother finished product, tighter-weave fabrics tend to work better. Do not use stretchy fabric. Fabric cut to about 12”x16” (30 cm x 41 cm) works well. If you are using the frame and deckle described here, the cloths will store two 5"x7" (130 mm x 180 mm) sheets of paper and, when put out to dry, they will hang over the clothesline with one sheet on each side. You want the couching cloths to be predominately natural fiber content to absorb the water. Cloth color only matter if it bleeds -- then the wet paper gets a nifty tint. Fifty couching cloths is a good estimate for what you need in order to make paper all day.
Setting Up At The Site
Set up the table. It should be low enough that children can make the paper, so it is likely to be lower than your normal comfort level. Keep in mind that water will drip from the table during the process, so make sure that the table is not angled to drip on the visitors’ feet. In the steps below, I am putting the cookie sheet piled with the couching clothes and wet paper on the left of the bucket using the right side for the dry couching cloths and anything else I need.
- Put the bowl in the middle of the table, close to the edge since small children cannot reach far.
- On the left side of the table, put one cookie sheets face down so any lip is on the underside.
- Lay a couple of couching sheets across the cookie sheets. With frame & deckles using 5x7 picture frames, cookie sheets can often have 2 piles of wet pages.
- Fold 2 couching cloths into fourths then put each one where you expect newly-made paper to be laid across. Having these here make transferring the first few sheets less error prone.
- Lay another couching cloth across the whole pile, covering the two folded couching cloths that you just laid down.
- Put some paper pulp in your large container. I tend to want to start with about one part pulp to six parts water and I am doing this so that the container is filled 4"-5" deep. This is when I use the whisk, but stirring by hand works too. Lumps left in the container will end up in the final paper although less pronounced. For the appropriate paper pulp consistency, think somewhere around milk. Now, this isn't a hard and fast rule. Page thickness is determined by how much pulp is pulled up with the frame and deckle, so you may want to adjust pulp consistency once you have made a few sheets and see how they are.
Making Paper at the Demo
Now, you are ready to make the paper. If you have not made paper before, the basic steps are listed below but you may also want to check out online videos to build your confidence doing this. As you become comfortable with making paper, during the process you can talk about paper in history. You will want to make a few sheets yourself first. This helps ensure that the wet paper will come off the deckle more easily; think of it as “priming the pump”. If the demo crowd comes in spurts, start with each new group by making a page or two and then the kids – and their parents -- will be interested in making some.
- Hold the frame and deckle together with the deckle on the bottom, screen side up. Flatly push these two items together into the container and gather some of the pulp in the screen. How much pulp you pull up determines the thickness of paper you are making.
- Lift up the frame and deckle together, keeping them level. Water will drip out; wait until it stops. While it’s still dripping, shake the frame and deckle a little to help the pulp shift and improve the final result.
- Lift the frame off the deckle – that is, take the top piece off the bottom piece. When it is a child making the paper, I hold the bottom piece and have them take the top frame off: it is an ooh-ahh moment for them. As you make pages yourself, you will find that eventually you can roll the frame off the deckle with your thumb. At this point, you might decide that you don’t like the look of the sheet. You can turn the deckle over and lightly shake the deckle’s screen across the top of the water. This will rinse off the screen so you can start again.
- Tilt the frame so that one corner is pointed toward the container. Water will start dripping again. During this step, you can introduce an aspect of science by telling your visitors about water surface tension. Once the frame stops dripping, you can turn it upside down and the paper stays stuck to the screen.
- Once the frame stops dripping, transfer it to the couching cloth. Turn it upside down and hold it above where you want to place the resulting page. Lower the frame so it is on the couching cloth. Push on the wooden part of the frame, not the screen. This is how you get the paper to stop sticking to the screen and now stick to the couching cloth. At this point, lift the frame straight up. Granted, some people will push the frame sideways which often smears the pulp across the cloth that the finished page becomes unusable. Lifting the frame off of the couching cloth is another ooh-ahh moment for children. Now the challenge is to keep the littlest kids from pushing their fingers into the wet page on the cloth (which tends to put holes in the finished page.
- Since the participant can't take home that wet page that they just made, hand them a sheet that was previously made (if you have any). This way, they walk off feeling that they have made something. Any pulp remaining on the kid's hands can be easily wiped off with a dry couching cloth (and you can use that cloth in your pile later.
- If the participants are small, you may need to rotate your cookie sheet so that the location where the next page should be laid is closest to the participant.
- After the two pages are made, one on each pile, lay down the next couching cloth, making sure to smooth out any wrinkles in the cloth. Any wrinkles left in place will cause a page to become ripped during the drying process.
If you have a drying rack, you can move some of the wet couching sheets with wet pages to the rack. Drying time depends on wind and humidity. Otherwise, paper made today is dry tomorrow.
As you make the paper, periodically you will need to replenish the pulp and the water in your working container. When added to the container, keep mixing to the consistency that you want. You can also mix some water and pulp in a sealed container and shake it before adding it to the larger container as a way to speed up the mixing and breaking up lumps.
Packing Up And Going Home
Toward the end of the day, if at all possible, I use up all the pulp in the container and then pour the remaining liquid that through the frame and deckle, making sure to work where the water will not disturb other demo participants -- i.e., not near armor bags. I then put the frames, deckles, whisk and other stuff into the papermaking tub. Any remaining paper pulp that is stored in containers with well-sealing lids and any remaining space in the container is filled with water. Add the remaining couching cloths on top of the pile of wet paper and couching cloths. Put the second cookie sheet on top of the pile to make a sandwich. Now, use the bungee cords to fasten the pile. Put the sodden pile into a waterproof container for transport home.
At Home - Drying the Paper
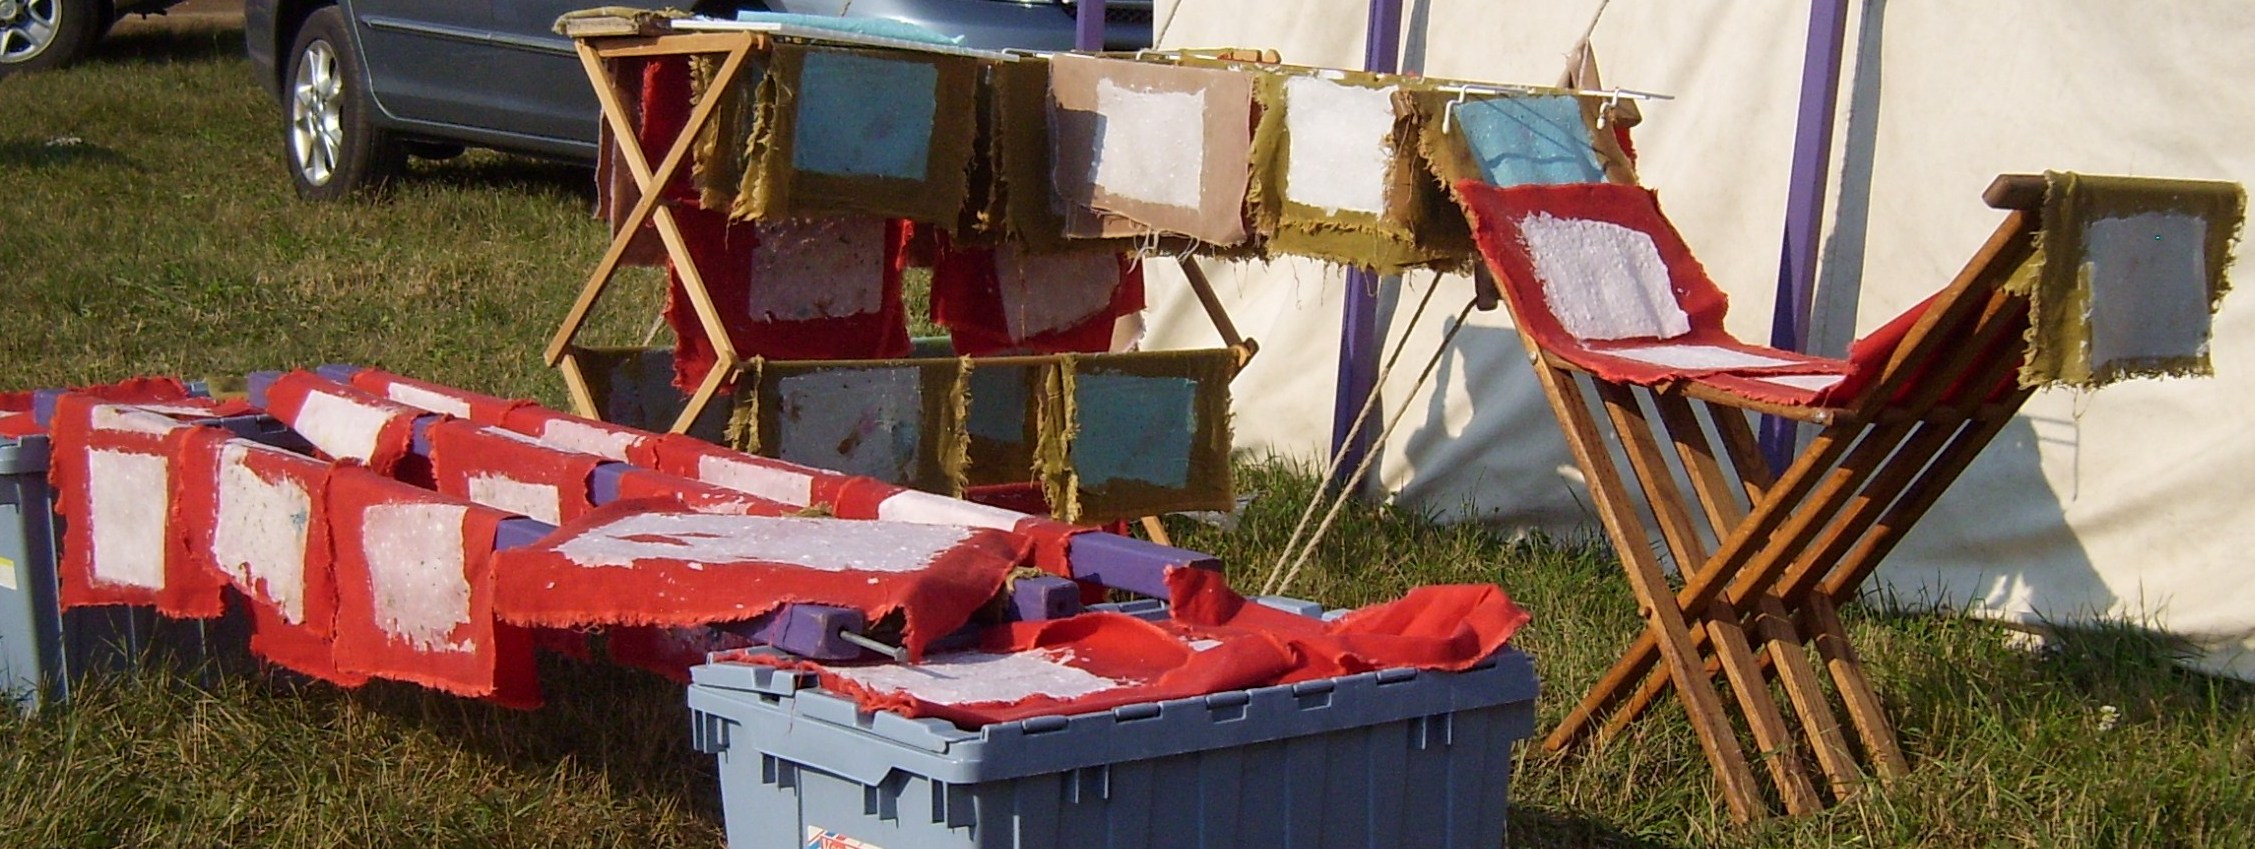
Remove the bungee cords from the wet paper pile and remove empty couching cloths that are at the top of the pile. Remove each couching cloth that has paper on it -- separating them without tearing them will take practice. If the paper starts clinging in the wrong spot, you can often scrape it away from the incorrect spot with a fingernail. At this point you will also discover which couching cloths work better than others for this process. If you end up with a couching cloth that has pages on both sides of the fabric, dry it that way. Drape larger cloths over the clothesline. With couching cloths that only fit one page of paper, use clothespins to attach it to the clothesline. Repeat for all couching cloths containing paper. If you are using a fan, position it to blow in the direction of the paper.
When the wet paper gets to a certain level of dryness, like a damp washcloth, you can use a rolling pin, or something like it, to flatten and press the paper. If done too early in the drying process, the paper will stick to the rolling pin or tear up the paper. Thus, it takes some practice to determine appropriate timing.
By the next morning, the paper should be mostly if not completely dry. Remove paper from couching cloths. The technique for peeling paper off the cloths is much the same as you might have used as a child, when peeling a carefully-applied solid layer of dried white glue from your fingers. Run couching cloths, both wet and dry, through the dryer. If you plan to use the cloths again the next day, any lingering paper or fibers on them will not interfere much. When the cloths come out of the dryer, flatten them out. I tend to sort the couching cloths to group the same types are together. Wipe down and scrape the whisk, rolling pin and the tub too. At this point, the frame(s), deckle(s), couching cloths and cookie sheets can be stored in the “Papermaking” bin, along with the finished paper ready for use.
Using the Resulting Paper
Paper made from cotton paper pulp is akin to the cotton rag paper you would purchase from an art supply store, and works well in other projects. Now the paper is ready to be sorted. Some pages won’t make it past a quality check. It may be the kid’s touching the transferred paper on the couching cloth ruined it or that the page clung partially to separate couching cloths so it ripped. Losing some pages this way is normal. I sort the resulting paper into four piles:
- Sheets with holes, wrong-sized, etc. that become sample sheets to be what is handed out on a subsequent day/demo.
- Lighter weight sheets suitable for putting into a book. For me, this becomes material for another class – bookbinding.
- Medium weight sheets for loose-leaf purposes such as event menus.
- Heavier weight that works well for: book covers for a soft binding, block printing, watercolor painting.
Once the paper is sorted, I may put it under some weight to flatten it further; this works best if the paper is just slightly damp.
I usually end up with a lot of thicker paper because kids tend to like getting more pulp on the screen. It is actually more of a challenge to create thinner paper. You will find that anyone can make card stock – that’s easy. Making thin sheets – that is the challenge.
If papermaking appeals to you, there are Facebook groups on it, papermaking museums and many other papermaking resources at your fingertips.
P.S. If you are in the Cleveland, Ohio area, you can contact me about getting some of the paper that I have made.